Reconciling Lazada Sales and Preparing Supporting Documents
How to reconcile Lazada sales using the Order and finance reports: separate receivables and expenses, and trace the Wallet balance through to the bank.
This article explains how to check whether sales, income released to your Lazada Wallet, expenses, and money transferred to your bank agree with each other, using three main files from Lazada Seller Center.
1. Files to download
Used to check the completed orders for the month.
Download path:
Orders → All → Custom → Export all
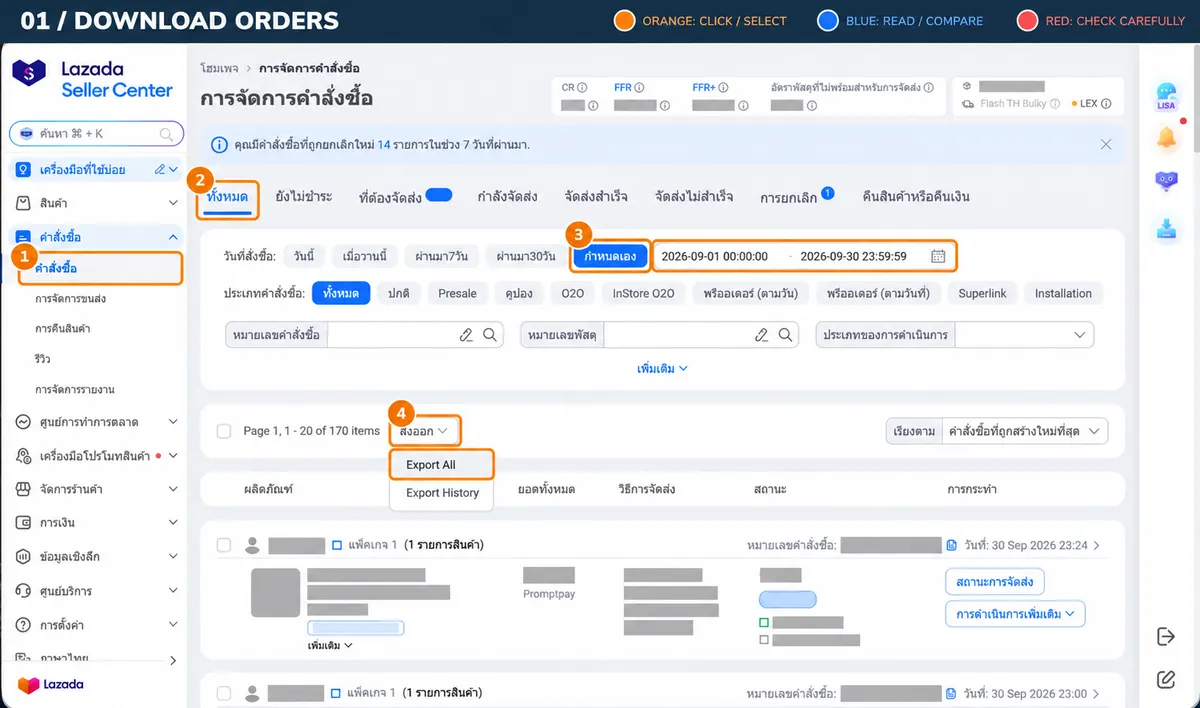
① Go to Orders → ② choose All → ③ set the date range to Custom → ④ choose Export → Export All. This downloads every status, so filter by status before summarising revenue.
We recommend naming files by month, for example: Lazada All Orders - Sep 2026
Used to check financial transactions and the amounts released to your Lazada Wallet after customers confirmed receipt.
Download path:
Finance → My Income → Income Overview → Released → Order creation Date
→ Download → Order details (Excel)
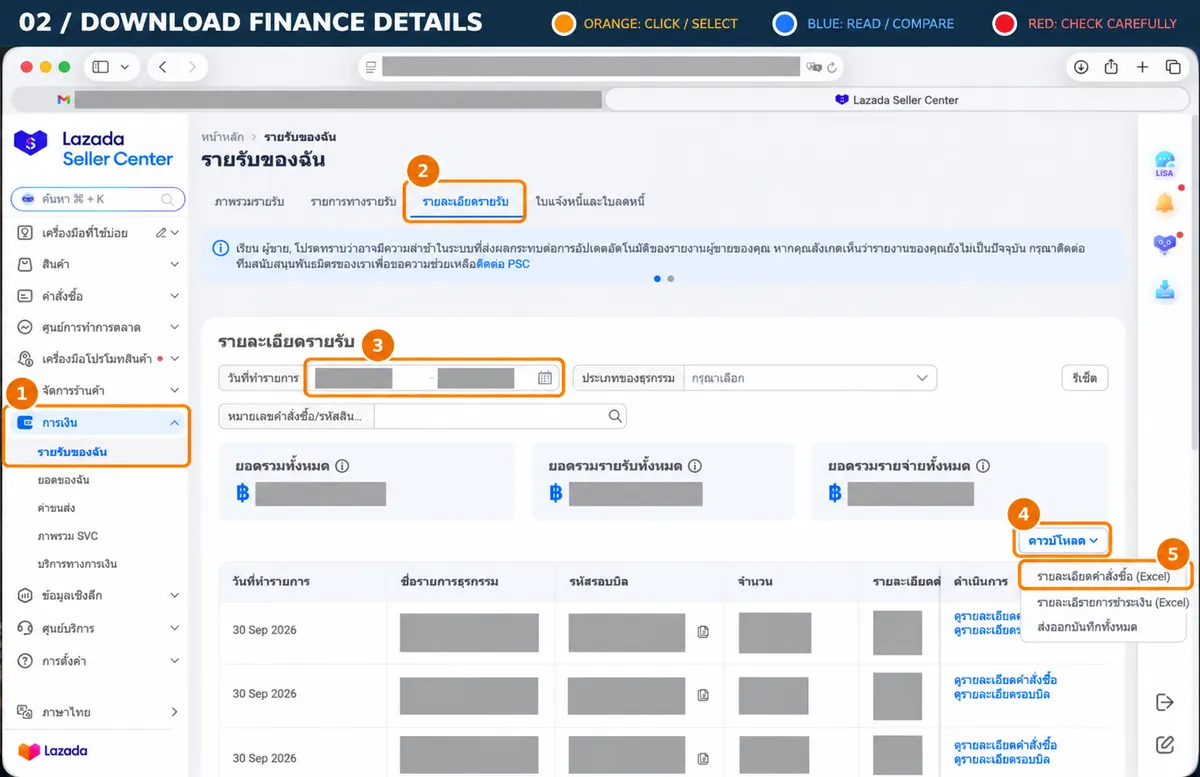
① Go to Finance → My Income → ② open Income Details → ③ choose the date range → ④ click Download → ⑤ choose Order details (Excel).
Note: this screenshot shows the Income Details tab, not Income Overview / Released as in the path above. Check the tab name and the date basis of the file you actually use.
Used to check the Wallet balance and the money Lazada transfers to your bank account.
Download path:
Finance → My Balance → choose Transaction Date → Export → Transactions details Excel
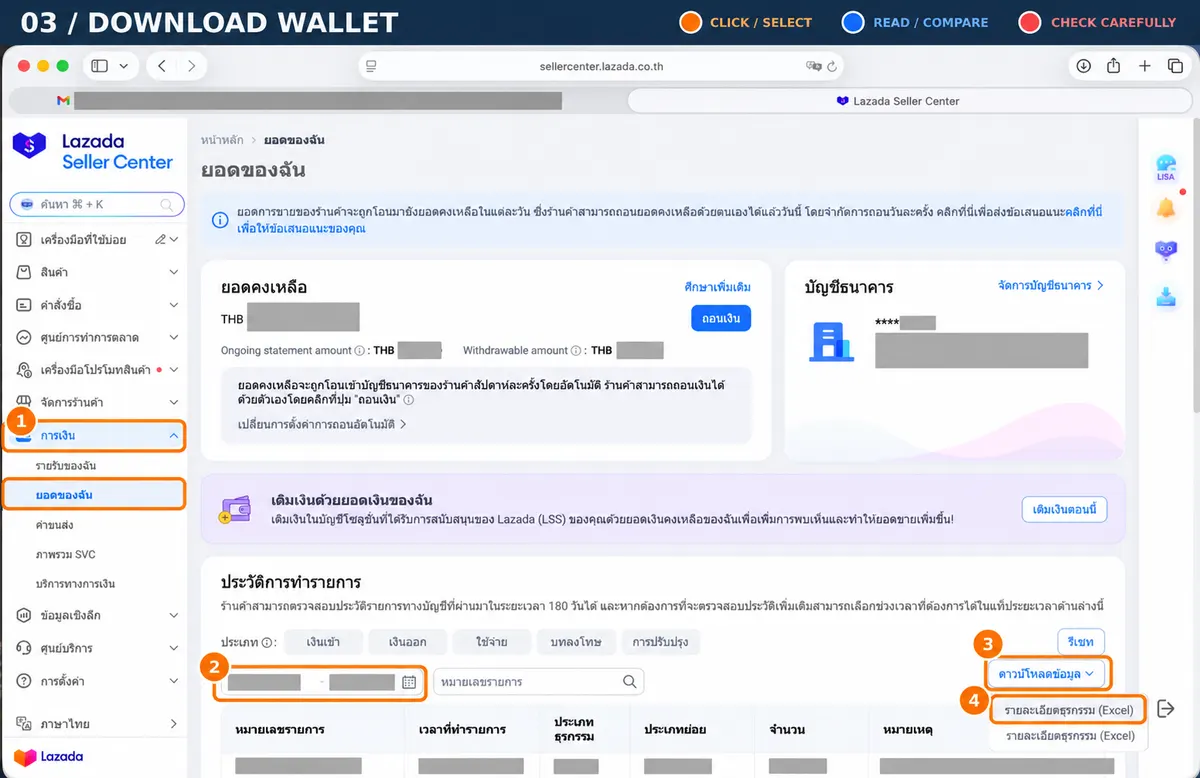
① Go to Finance → My Balance → ② choose the date range → ③ click Download data → ④ choose Transaction details (Excel). Use the Wallet movement report, not the withdrawal button.
2. Summarise revenue from the Order.list.export file
The key columns are:
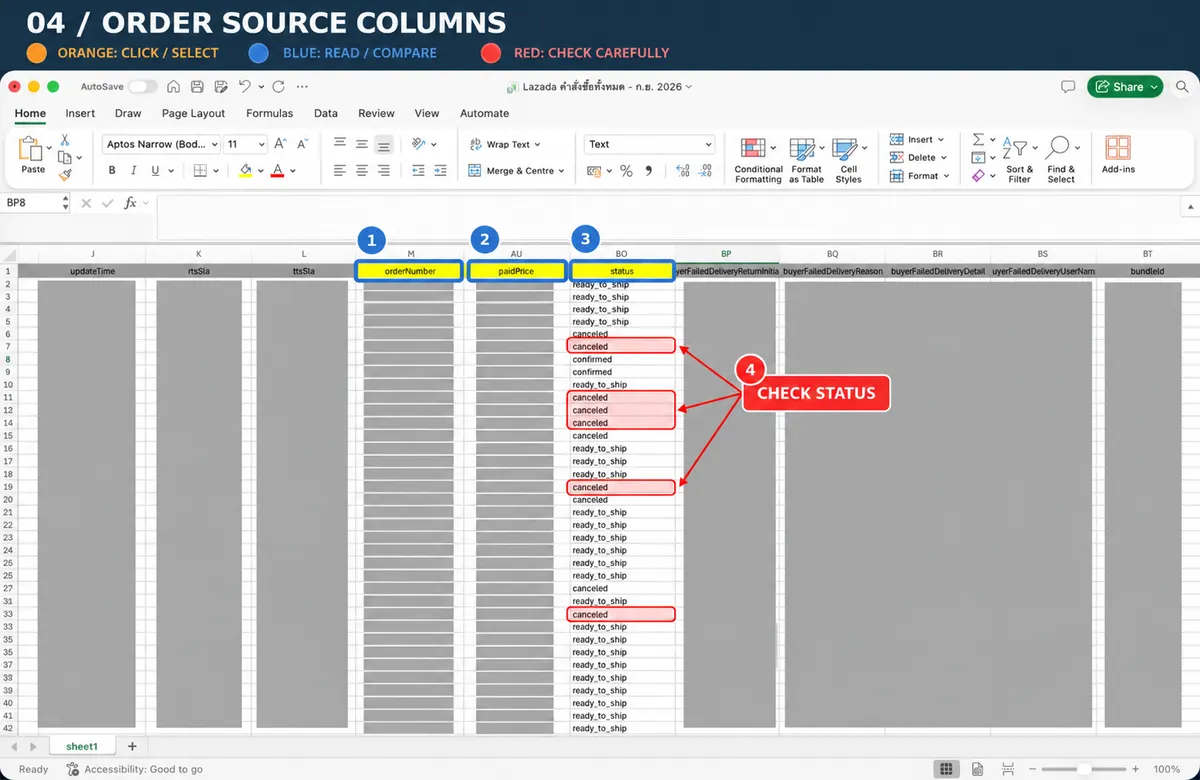
Blue box: M = orderNumber, AU = paidPrice, BO = status. Red box: check for canceled status before adding up. The screenshot still contains ready_to_ship and canceled rows, so it is unfiltered data, not all completed sales.
| Data | Column |
|---|---|
| Order number (orderNumber) | M |
| Price paid (paidPrice) | AU |
| Order status (status) | BO |
Because one order may contain several items, the same order number can appear on several rows. Summarise it down to one row per order.
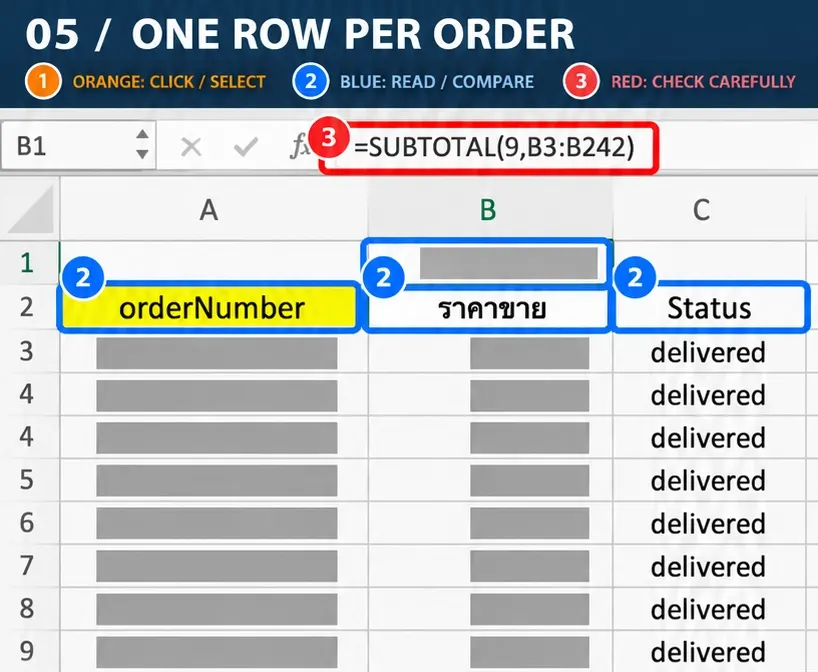
Read the column headers orderNumber / Selling price / Status and the SUBTOTAL formula in the formula bar. This screenshot shows the result after the data was prepared; it does not yet show the Remove Duplicates, SUMIF or XLOOKUP steps.
Open a new sheet
Take the orderNumber values and build a list of unique order numbers
Use Remove Duplicates
Use SUMIF to add up paidPrice
Use XLOOKUP to pull in the order status
Before adding up, check the date basis and the statuses that qualify for the period. Set canceled, ready_to_ship and returned items aside for review; do not treat every status as revenue automatically. If one order has several statuses, check at item level instead of using the first row's status for the whole order.
Keep every original row, create the unique order numbers in the summary sheet, then add up only the paidPrice of qualifying items without deducting discounts or refunds a second time.
Example of the idea: revenue per order = the sum of paidPrice for the same Order number
3. Summarise revenue from the finance.export.transaction file
Main data used:
Order No
Amount
Freename
The method this guide recommends is a PivotTable
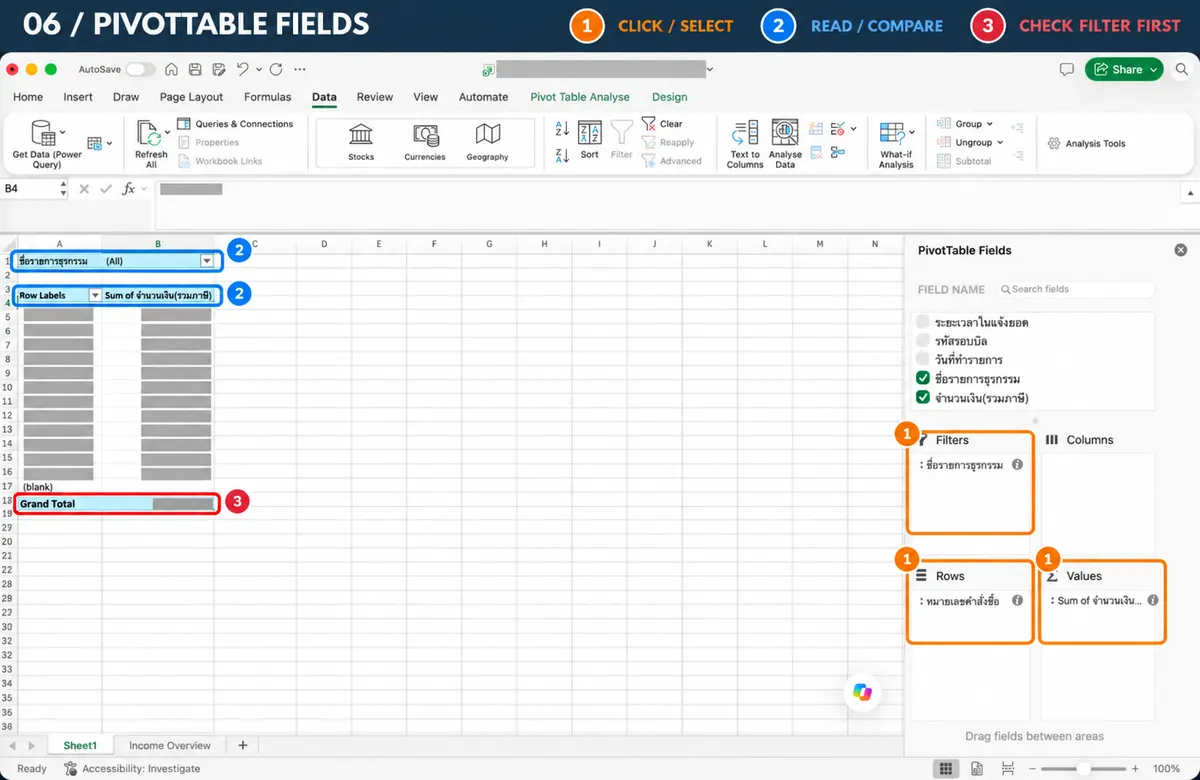
Set up the PivotTable with Filters = transaction name, Rows = order number, Values = Sum of amount (incl. tax). Check the filter before using the result: the screenshot still shows (All) and a (blank) row, so it is not automatically pure revenue.
Filters: Freename
Rows: Order No
Values: Amount
Items to consider, for example:
Item Price Credit
Promotional Charges Vouchers
Reversal Item Price
After summarising, copy the result out into a new table and remember to remove the Grand Total row first, because that total could create duplicate differences against other items.
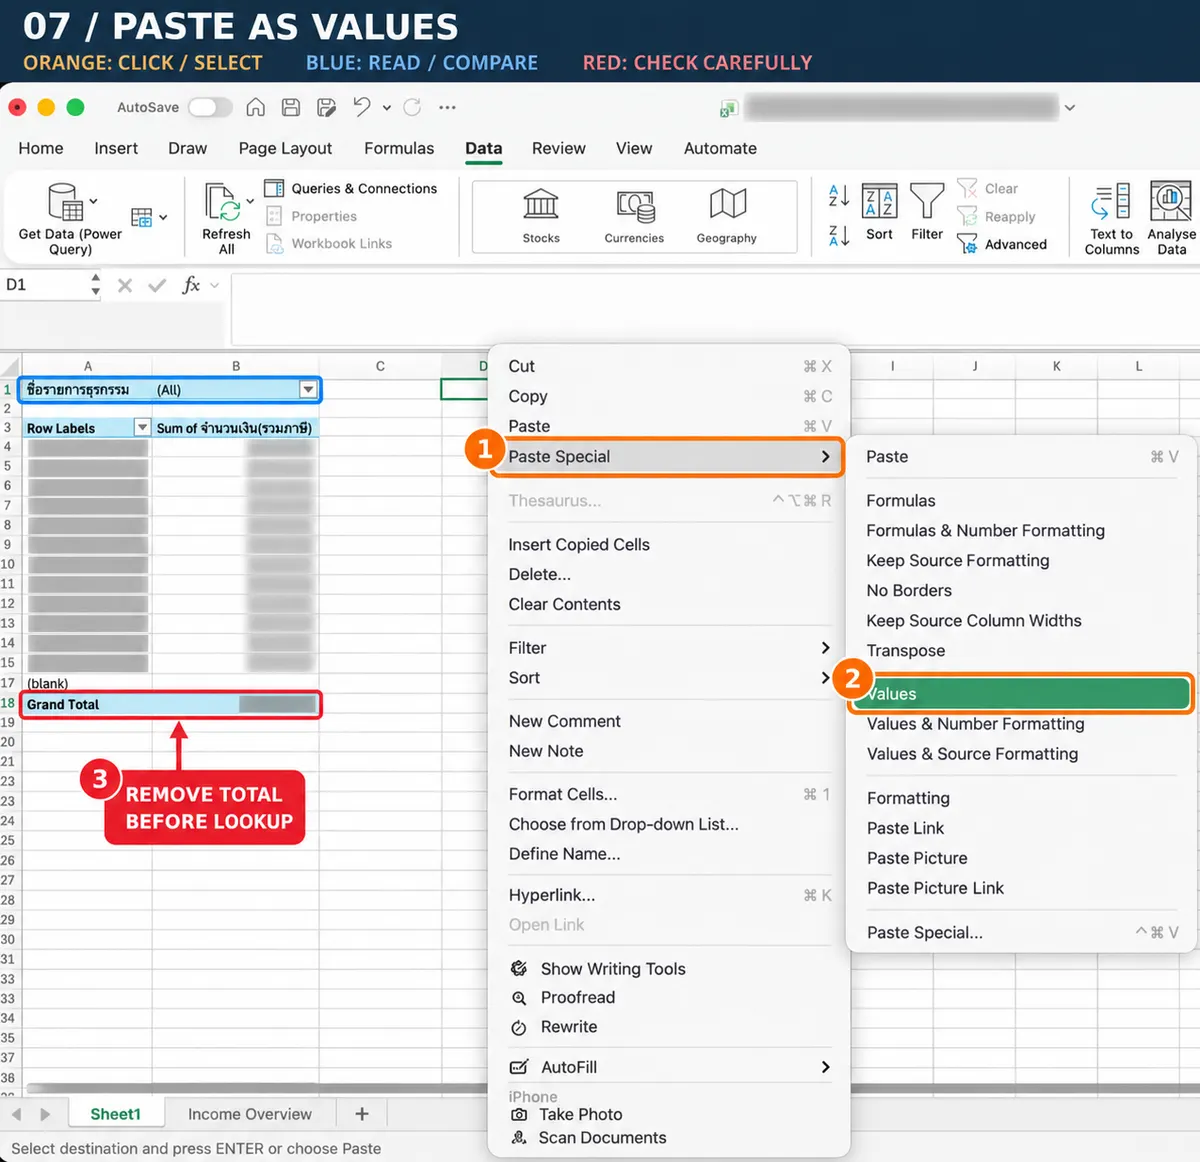
① Choose Paste Special → ② choose Values to copy the PivotTable result as fixed values. Separate the Grand Total row from the order rows before using them for lookups and totals.
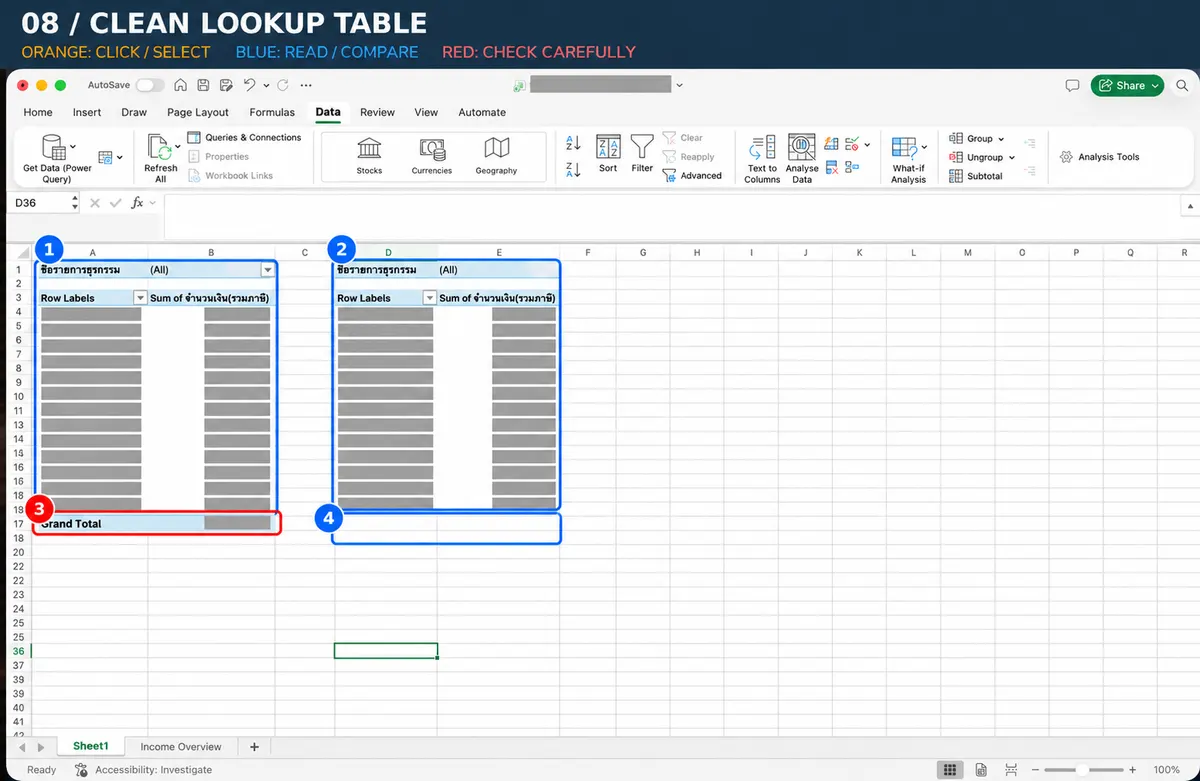
The left blue box is the source PivotTable; the right blue box is the table copied as values. Check that the destination table has no Grand Total or (blank) rows mixed in with the order rows.
4. Compare revenue between the two files
Reconcile in two directions so nothing is missed: orders that were sold but not yet paid, and money received that belongs to orders from a previous period.
4.1 Reconcile from Order.list.export to finance.export.transaction
Use XLOOKUP to pull in the finance-side revenue figure for comparing orders, and compare it with the revenue from the orders file.
The main difference formula:
Difference = revenue from orders − finance-side revenue for comparing orders
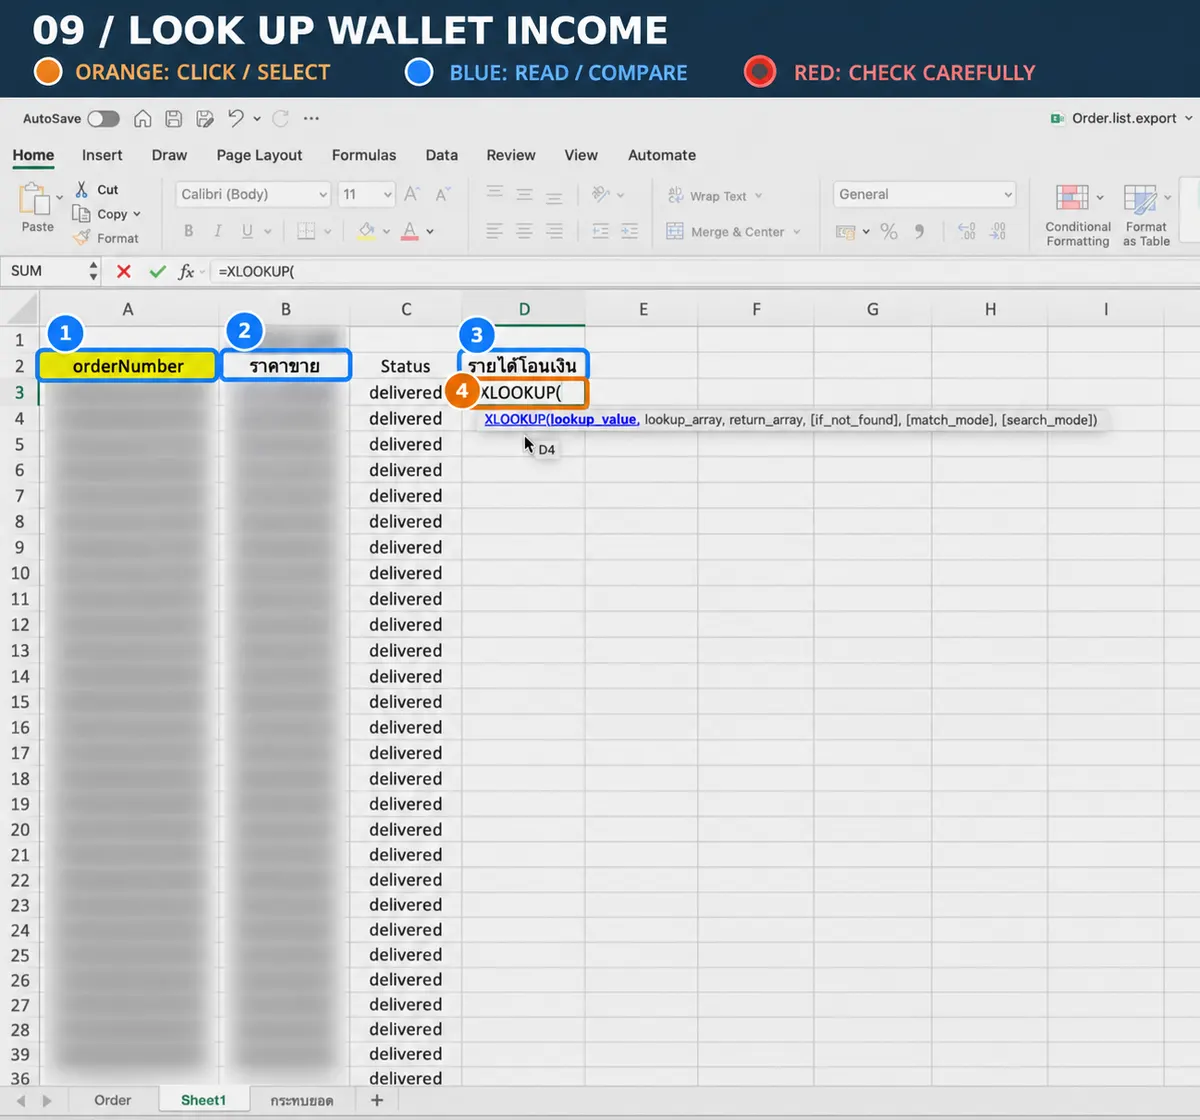
Use the orderNumber as the lookup value and pull the revenue from the finance file into column D (revenue transferred). This screenshot only shows the start of typing XLOOKUP; it is not a complete, ready-to-use formula.
Difference = 0: the revenue on both sides agrees for the matched items. You still need to check the net amount received and the date the money entered the Wallet.
Result is #N/A: the formula could not find the order. Check the order-number format, date range, status and refunds first. Only if you confirm the revenue has been earned but the money has not been received by period end, classify it as closing receivable, with order-level evidence.
4.2 Reconcile back from finance.export.transaction to Order.list.export
Start from the finance revenue table summarised per order, then use XLOOKUP to pull in the revenue from the orders file for comparison, keeping the revenue-for-comparison figure separate from the net amount received into the Wallet.
Difference formula:
Difference = finance-side revenue for comparing orders − revenue from orders
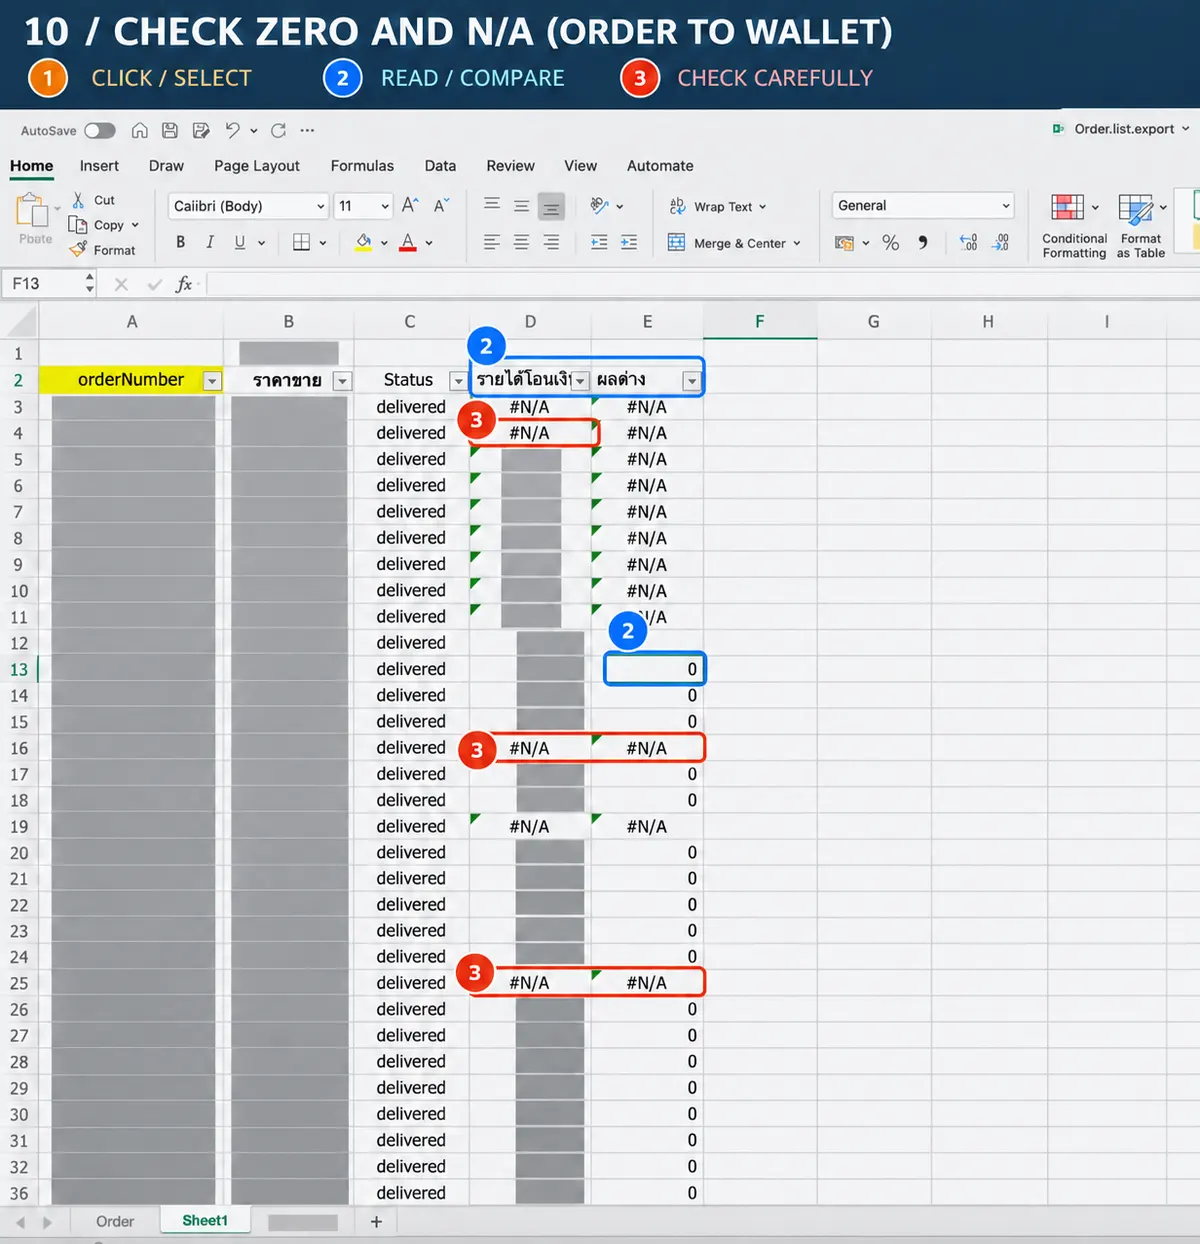
Blue box: compare revenue transferred with the difference. Red box: check for #N/A.
Note: this screenshot is still the check from the Order side to the Wallet, not the reverse reconciliation from finance to Order described in section 4.2. A screenshot from the finance side should be added to explain brought-forward receivables in line with the steps.
Difference = 0: the revenue used for comparison agrees for that order.
Result is #N/A: the order is not in the period's sales file. Check the previous month, the order-number format and adjustments. If you confirm it is an order still unpaid from a previous period, classify it as receivable brought forward and collected this period, which is not the full opening receivable balance. Keep items with unknown causes as items pending review.
How to check the reconciliation is correct
After checking in both directions, confirm every item has a match or a documented reason, then separate two layers:
- Revenue for comparing orders must agree on the same basis, or have a table explaining the differences.
- Net amount received after deductions and adjustments must be traced to the money entering the Wallet and the withdrawal reaching the bank.
Matching totals alone do not confirm the reconciliation is closed if there are still order-level differences with unknown causes.
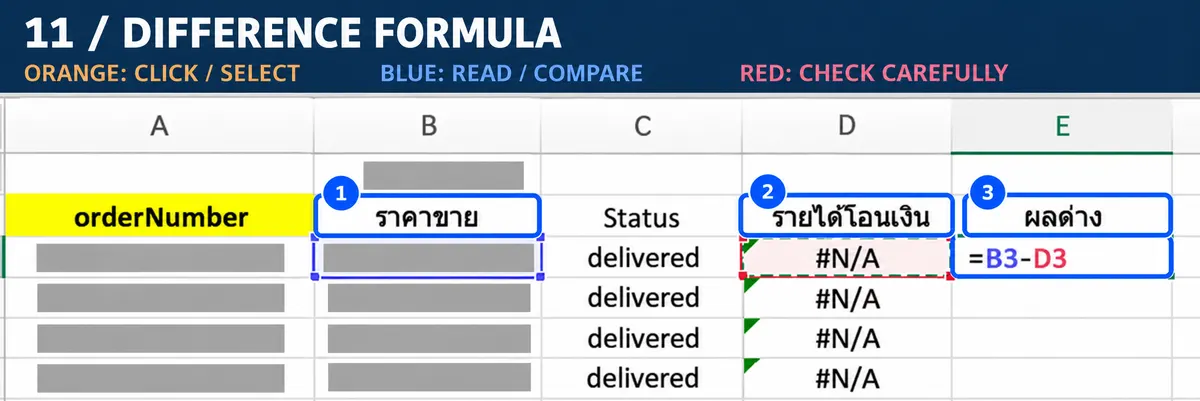
Close-up of the difference formula =B3-D3, where B is the selling price and D is the revenue transferred.
Note: this screenshot shows the order-level formula; it does not yet show a summary table proving that total net revenue agrees with the revenue entering the Wallet.
5. Summarise platform expenses
Use the finance.export.transaction file and filter on the Freename column
5.1 Shipping fees
Select the rows:
Shipping fee Voucher Refund to Lazada
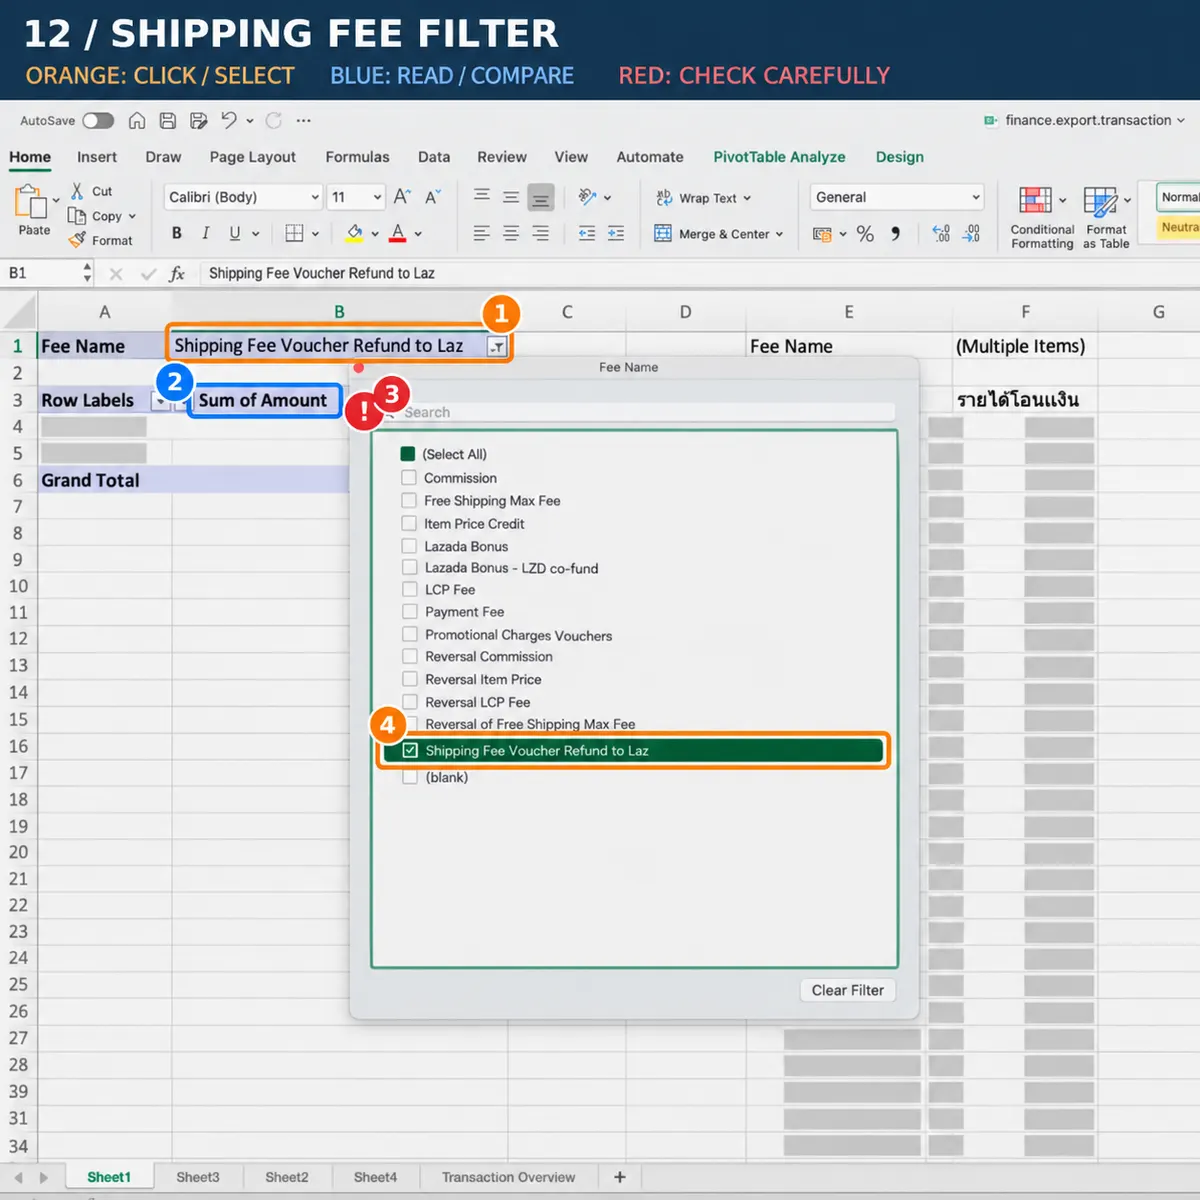
Choose the filter Fee Name → Shipping Fee Voucher Refund to Lazada, then read Sum of Amount and check the plus/minus sign before putting the amount into the shipping table.
Then:
Total the amounts from the PivotTable
Put the amount into the shipping table
Keep the signs from the original data. If your summary table uses expenses as positive numbers and then deducts them, convert the signs by a clear rule, separate fee refunds, and do not apply absolute values to every transaction.
5.2 Service fees
Classify transactions by Fee Name and their actual details; do not classify everything that is left as service fees.
- Revenue and discounts: item amounts and related promotions
- Refunds or reversals: separate by order and the period concerned
- Shipping: separate shipping fees, subsidies and returns or adjustments
- Service fees: selling fees, payment fees and packages according to the details
- Adjustments or unspecified items: check the evidence before categorising
If there are other expense types besides shipping and service fees, you can add them to the table separately.
Use the screenshot below to check the service-fee type filter before using the amount to work out the net amount received:
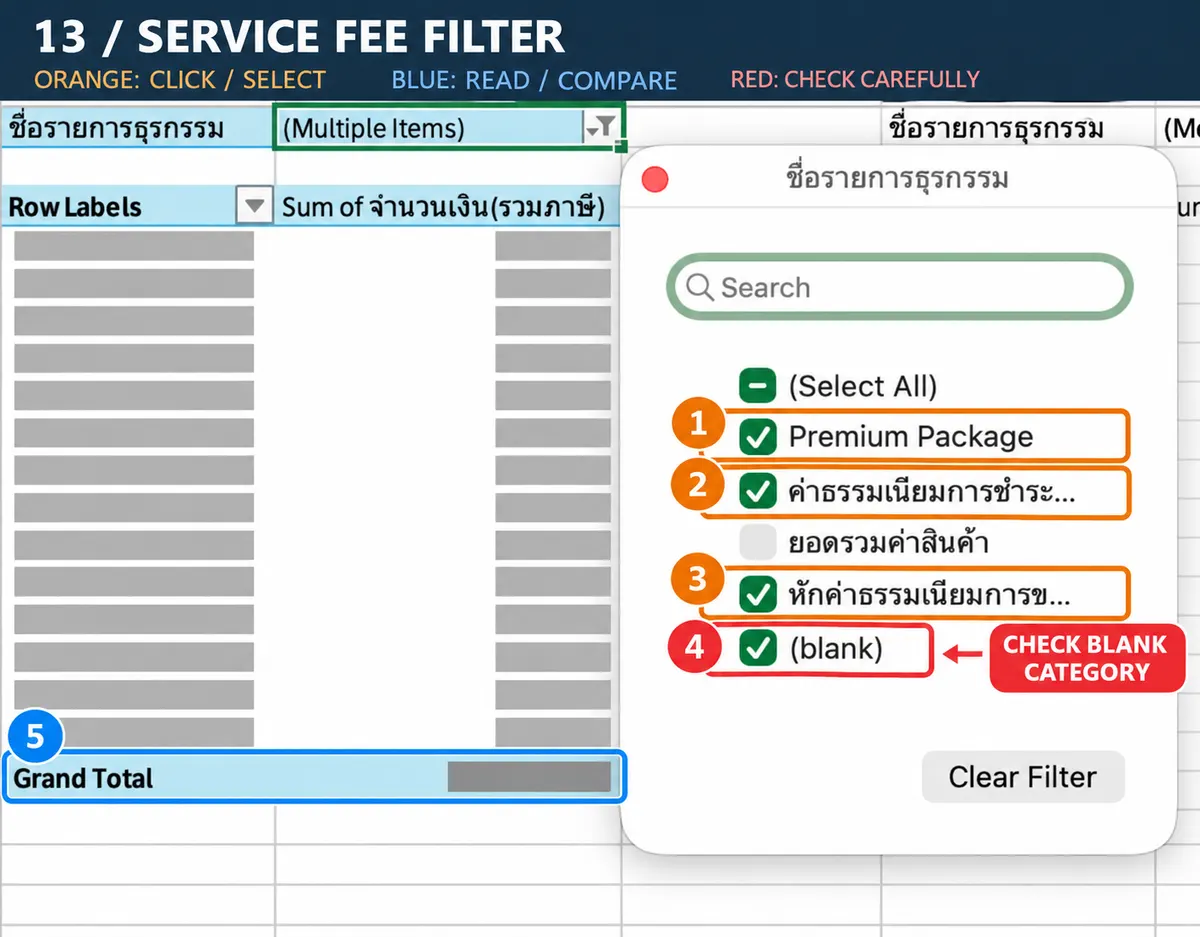
Select the relevant service-fee categories, such as Premium Package / Payment fee / Selling fee, then read the Grand Total.
Note: (blank) is selected in the screenshot. Check items with no type before adding up. This screenshot is an expense filter, not a summary table of the net amount entering the Wallet.
6. Reconcile the Lazada Wallet
Use the wallet file
6.1 Check money transferred to the bank
Use the filters:
Type — column C
Amount — column E
Select only the items that are transfers to the bank account, then total the Amount.
Put the amount into the table:
Transfer to bank
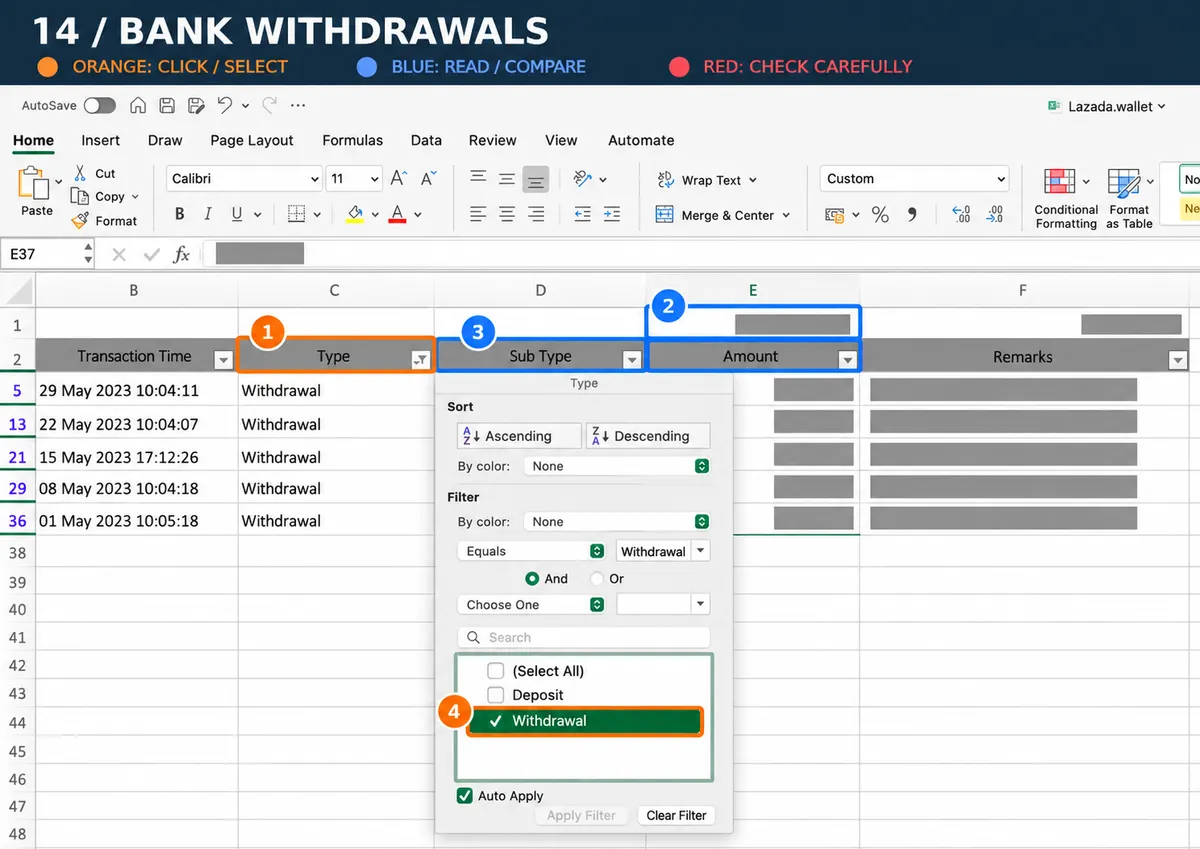
Orange boxes ① Type (C) and ④ Withdrawal are used to select only withdrawals. Blue box ② Amount (E) is used to check the total, and ③ Sub Type (D) is the sub-type column. Check the status and the date the withdrawal succeeded, then match it with the bank statement. Auto Withdrawal is a sub-type of withdrawal and is not used as the brought-forward balance.
6.2 Check the brought-forward balance
Use the previous period's closing balance as the Wallet brought-forward balance and compare it with the opening balance of the current report.
Auto Withdrawal is a type of withdrawal transaction, not automatically the brought-forward balance. Do not add up withdrawals and use that as the opening balance.
If you only have the balance after the first transaction, calculate brought-forward balance = balance after the first transaction − first money in + first money out. Check the order of dates and times and the signs. If the report has no balance column, use an additional balance report.
6.3 Summarise the balance
Once you have totalled revenue, deducted expenses, checked the money transferred to the bank and considered the brought-forward balance, you will know:
Whether all the money has entered the Wallet?
How much has been transferred to the bank?
How much is left that is expected to be transferred next month?
Calculate brought-forward balance + total money in − total money out = carried-forward balance and compare it with the Wallet report at period end. Do not deduct fees again if the money in is already a net amount.
The figure THB 5,154.84 is an example from the reference guide, not an amount guaranteed to be received next month. Show the supporting items and check the actual withdrawal status.
Hypothetical example, in THB: brought forward 1,000 + net received from orders 10,000 + adjustments up 200 − withdrawn to bank 8,000 − expenses paid separately from the Wallet 500 = carried forward 2,700. The 500 expense must not already be included in the net received 10,000.
Quick summary of the process
- Download Order.list.export
- Total revenue by order number
- Download finance.export.transaction
- Total by Order No with a PivotTable
- Use XLOOKUP to compare revenue between the two files
- Check the differences and unmatched items, then classify receivables or pending items according to the evidence
- Summarise shipping and service fees
- Check the wallet file
- Total the money transferred to the bank and the brought-forward balance
- Check that revenue and the Wallet agree