Reconciling TikTok Shop Revenue and Preparing Supporting Documents
How to reconcile TikTok Shop revenue in both directions: separate receivables, expenses and net amounts received, and trace the Wallet to the bank.
This guide explains how to reconcile TikTok Shop order revenue with the amounts transferred to your Wallet, using two main files:
- The “All Orders” file — used to calculate revenue per order
- The “Income” file — used to check the amounts transferred to your Wallet
1. การดาวน์โหลดไฟล์
- Order completed: TikTok Shop → Orders → Manage Orders → All → choose date range → Download filtered orders → Excel
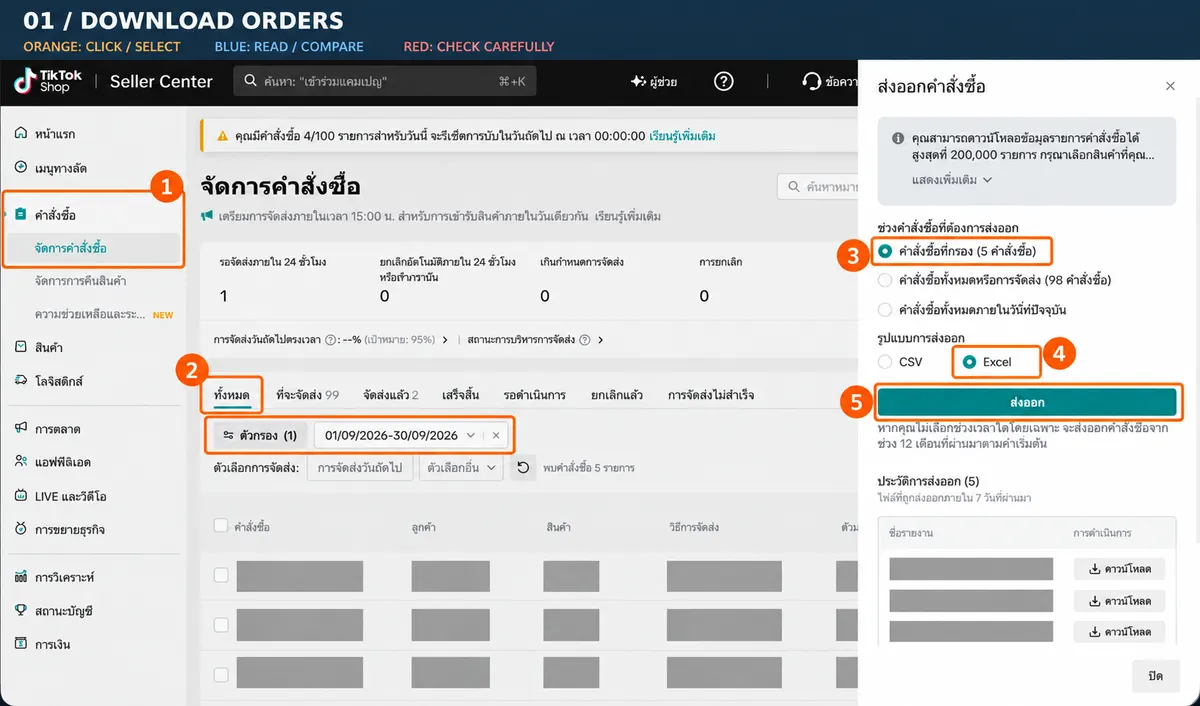
① Open Orders → Manage Orders → ② choose All and the date range → ③ choose Filtered orders → ④ choose Excel → ⑤ click Export. This screenshot uses the All tab, so check the statuses before adding up revenue.
- Income: Finance → Withdrawals → Export → choose date range
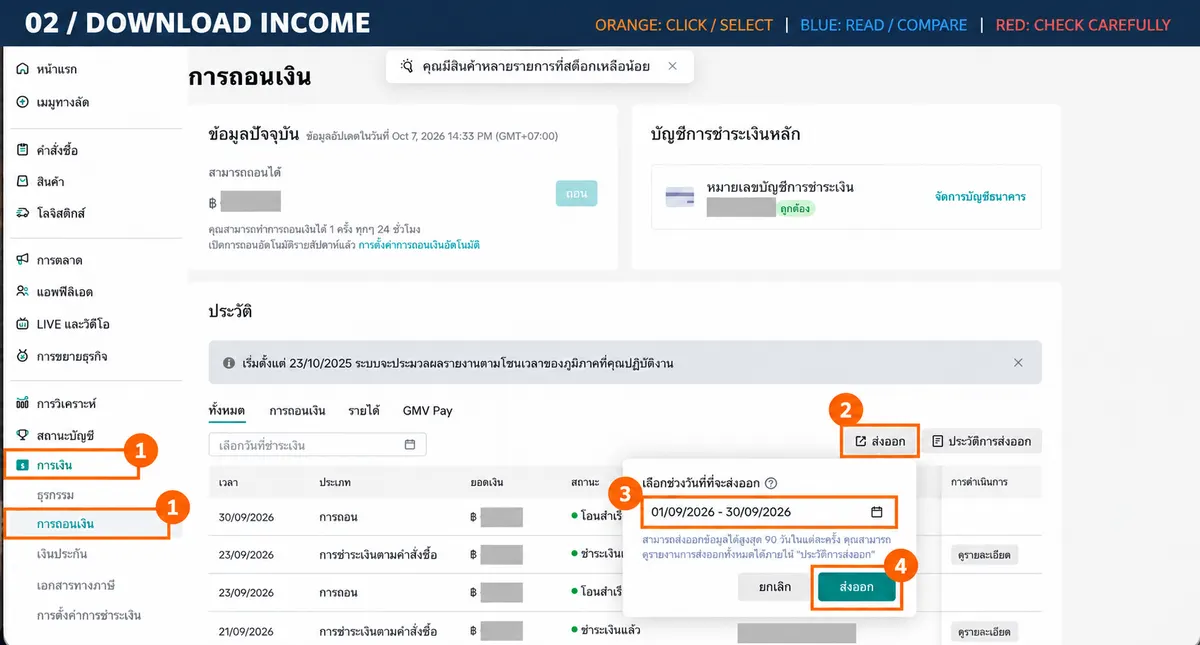
① Open Finance → Withdrawals → ② click Export → ③ choose the date range → ④ click Export in the dialog. Account details and actual balances are hidden.
2. การคำนวณรายได้จากไฟล์คำสั่งซื้อ
Revenue per order is calculated from:
Calculation method: 1 = M item subtotal before discount, 2 = O seller discount, 3 = Q shipping fee after discount. Use M − O + Q, checking whether the data is at item level or order level before adding up.
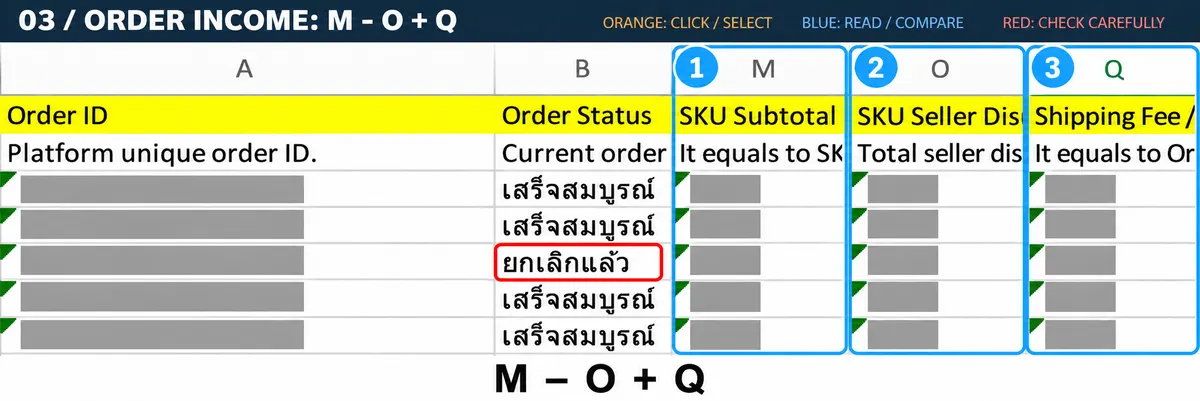
Blue boxes: ① M = SKU Subtotal, ② O = Seller discount, ③ Q = Shipping Fee. Use the idea M − O + Q and check whether the data is per item or per order before totalling. The red box is for checking the Canceled status separately.
How to prepare the data:
- Keep every original row. Copy only the Order ID to a summary sheet, then use Remove Duplicates or UNIQUE to create unique order numbers. Do not delete item rows in the original file before totalling.
- Use
SUMIFto total the item amounts in column M - Use
XLOOKUPorVLOOKUPto pull in the order status - For shipping fees and platform discounts that appear only on the first row, use
XLOOKUPorVLOOKUPinstead of totalling withSUMIF. - Separate Canceled orders from the sales that qualify for the period, and check refunds separately. If a sales document or tax invoice was already issued, check the cancellation or amendment of the document according to the facts; not every cancelled order requires a credit note.
3. สรุปยอดรายได้สำหรับเทียบออเดอร์จาก Income
In the example, the Income-side revenue used to compare with orders is calculated from:
Calculation method: 1 = G total revenue, 2 = U customer shipping fee. Use G + U as the figure for comparing revenue with the orders file.
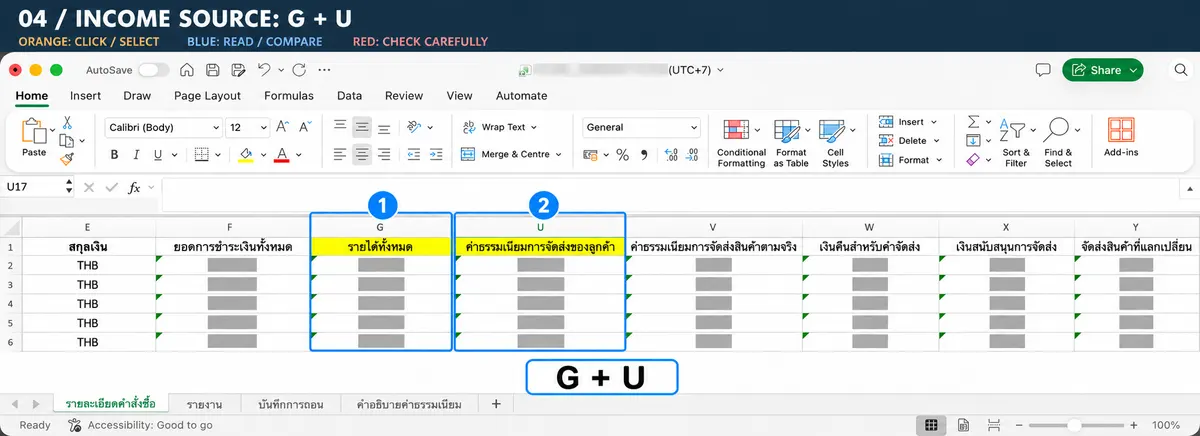
Blue boxes: ① G = Total revenue and ② U = Customer shipping fee. Use G + U as the figure for comparison with order revenue, referring to the column headers of the actual file.
4. การกระทบยอดระหว่างรายได้กับยอดโอน
Check Orders → Income and Income → Orders separately. Summarise both sides to one amount per order before matching, so you find items missed in both directions.
Take the revenue already summarised per order and subtract the matched revenue from Income.
Difference = revenue from orders − Income-side revenue for comparing orders
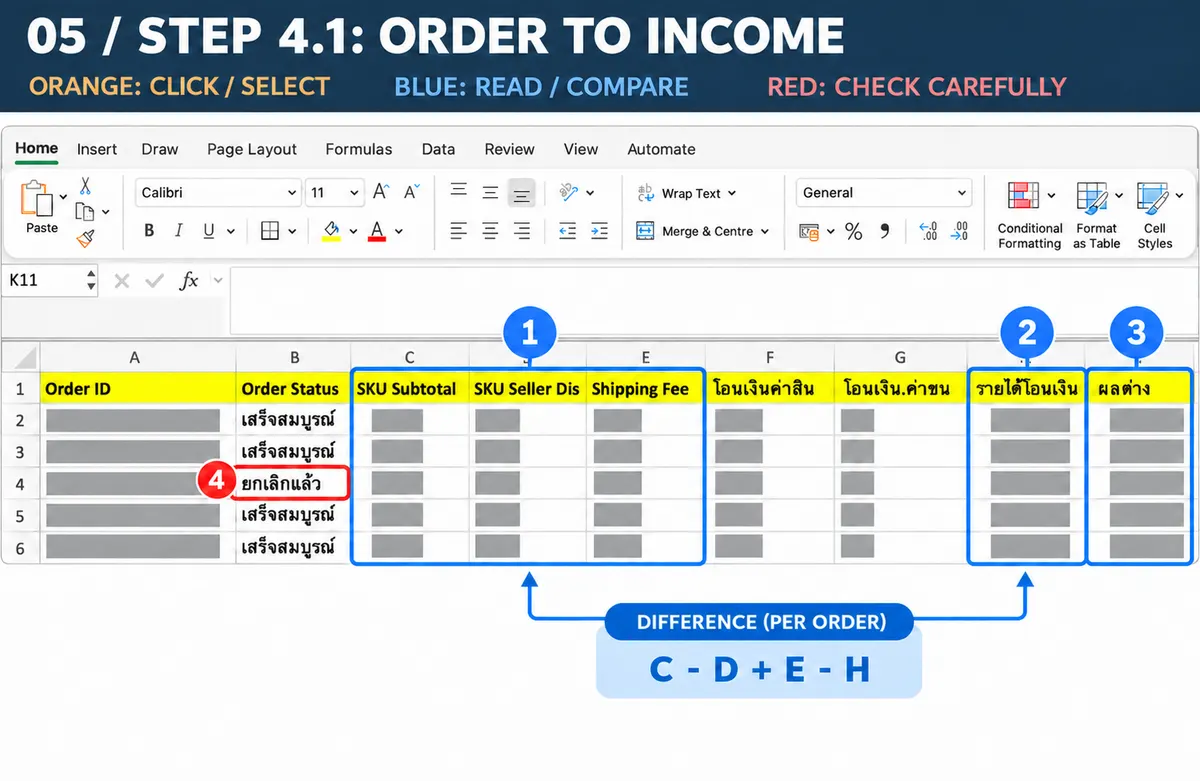
Blue boxes: ① C–E are the revenue components in the summary sheet C − D + E, ② H is the Income-side revenue for comparing orders, and ③ I is the difference. The idea of the difference is (C − D + E) − H, where C–E correspond to M/O/Q in the source orders file.
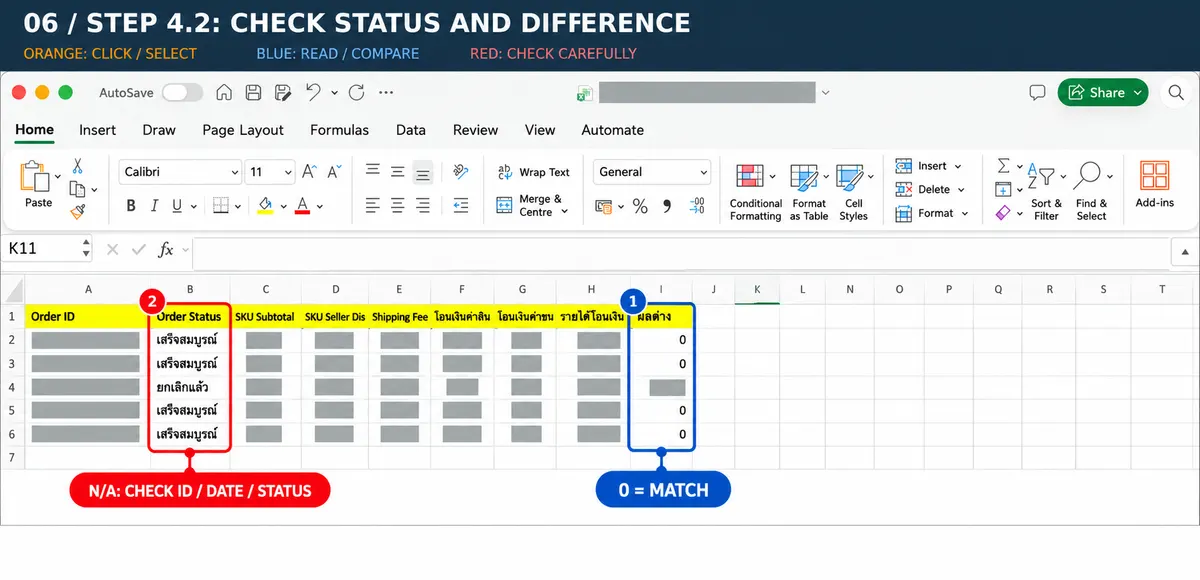
The blue box points to the Difference column and the matching 0 values. The red box points to Order Status, especially Canceled: separate cancelled items, and check the Order ID, date range and payment status before using N/A to classify receivables.
- Difference = 0: both sides agree for the matched orders.
- Shows N/A: the formula could not find a matching order. Check the Order ID format, date range and payment status first.
- If you confirm it is revenue of this period that had not been transferred to the Wallet at period end, classify it as a closing receivable.
Open the Income file, use Order ID as the matching key, and find the Income-side comparison revenue from Total revenue + Customer shipping fee.
Income-side revenue for comparing orders = G + U
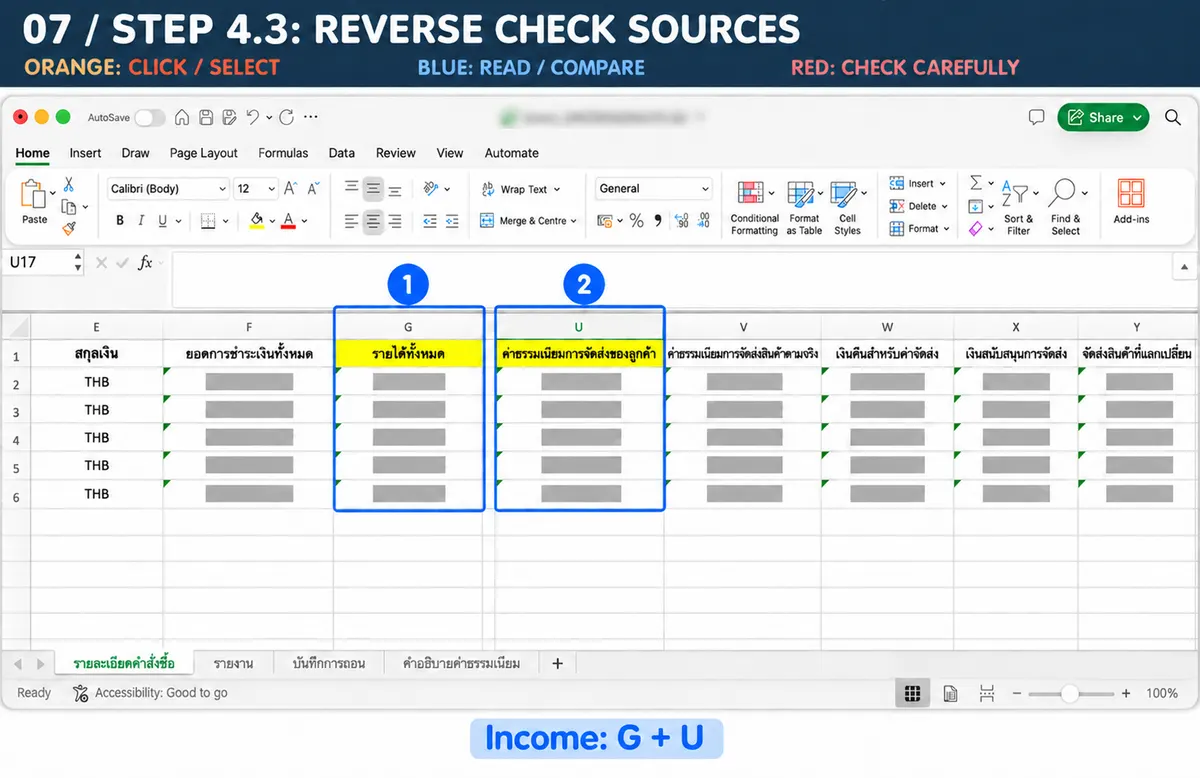
Blue boxes: ① G = Total revenue, ② U = Customer shipping fee. Use G + U as the Income-side figure and summarise per order before starting the reverse reconciliation.
In the Income-side reconciliation table, add a column “Revenue from orders” and use XLOOKUP or VLOOKUP to match Order ID against the orders table already summarised per order.
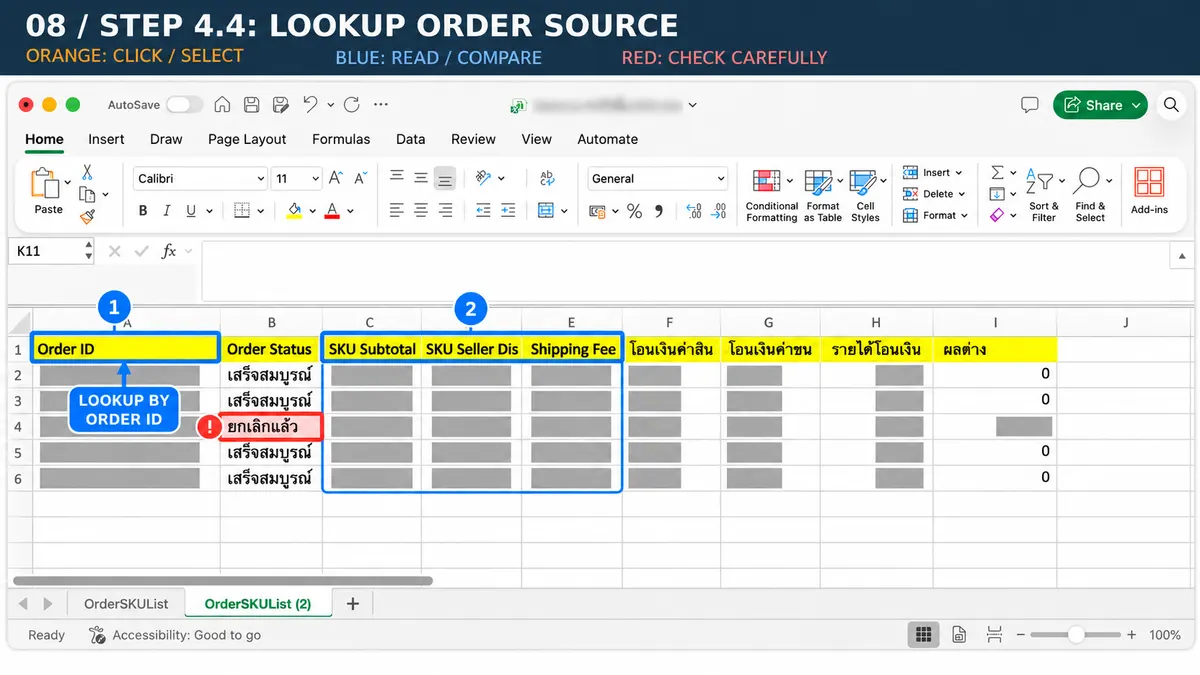
The blue box marks the Order ID (A) used for matching and the revenue components C–E. This screenshot shows the source data to pull from: use XLOOKUP/VLOOKUP to add the order-revenue column in the Income-side reconciliation table. Cancelled status must be checked separately.
Add a reverse-difference column, then subtract the order revenue pulled in step 4.4 from the Income-side revenue for comparing orders.
Reverse difference = Income-side revenue for comparing orders − revenue from orders
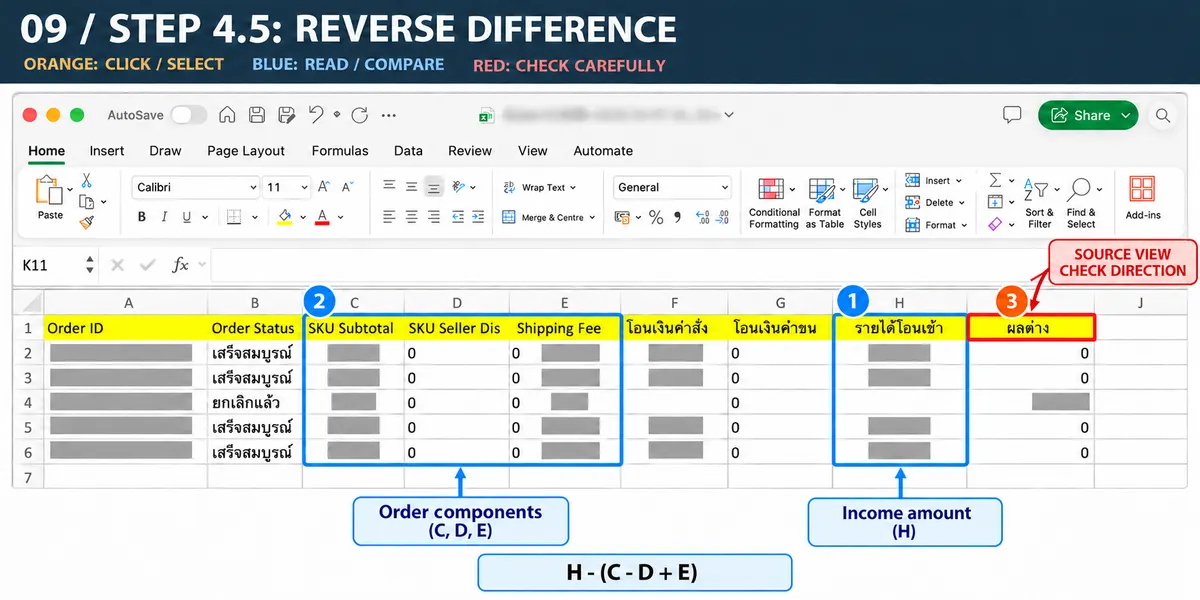
The blue boxes H and C–E reference the two sides. The idea of the reverse difference is H − (C − D + E); build the formula in the Income-side table. Column I in the screenshot is still the difference from the orders side, so use this screenshot to explain the data source, not as a finished reverse calculation.
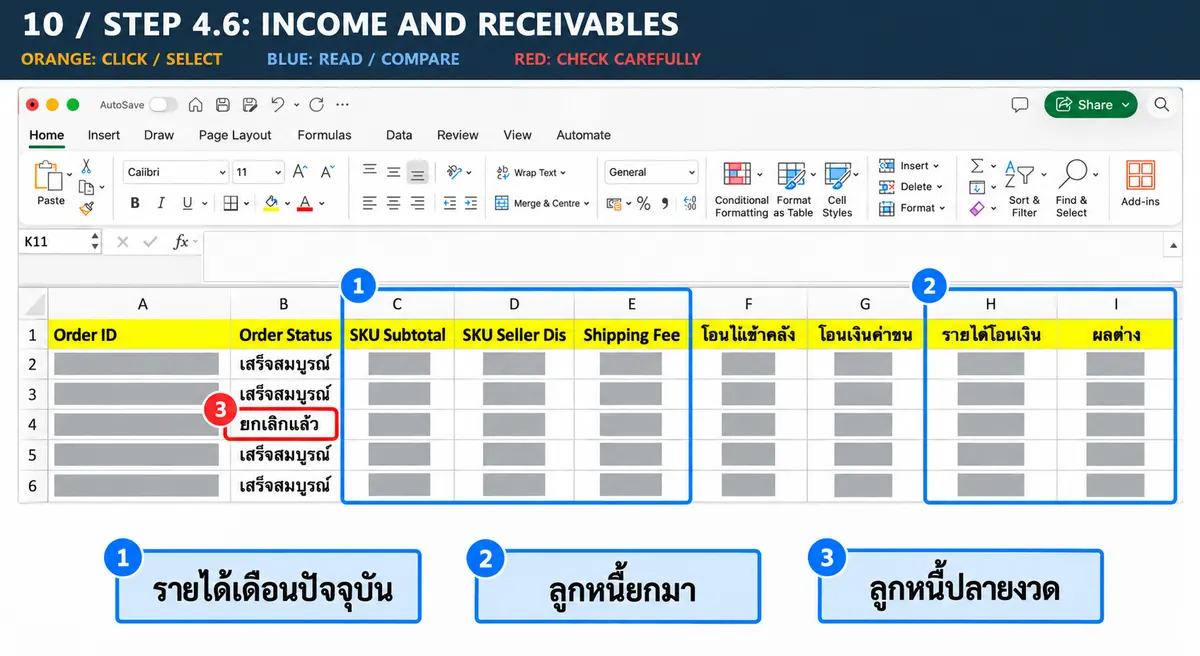
Read the revenue components C–E and the comparison figures H–I, then classify them as current-month revenue / receivables brought forward / closing receivables according to the evidence for each item. This screenshot is not yet a summary table of the totals for all three groups.
- Current-month revenue: from the orders table summarised in section 2
- Receivables brought forward and collected this period: check items in Income that were paid this period but were revenue of a previous period. Keep them separate from the total opening receivable balance, which must agree with the previous period's closing outstanding table.
- Closing receivables: check from this period's revenue that had not entered the Wallet at period end, as in section 4.2
Note: separate the revenue components from the comparison figure, then place items into the three summary groups, without relying on N/A alone to decide.
5. การสรุปค่าใช้จ่ายแพลตฟอร์ม
From the Income file, check the following column headers and components before summarising expenses:
- Total fees — column N in this sample screenshot (always check the column header first, because the position may differ in other report versions)
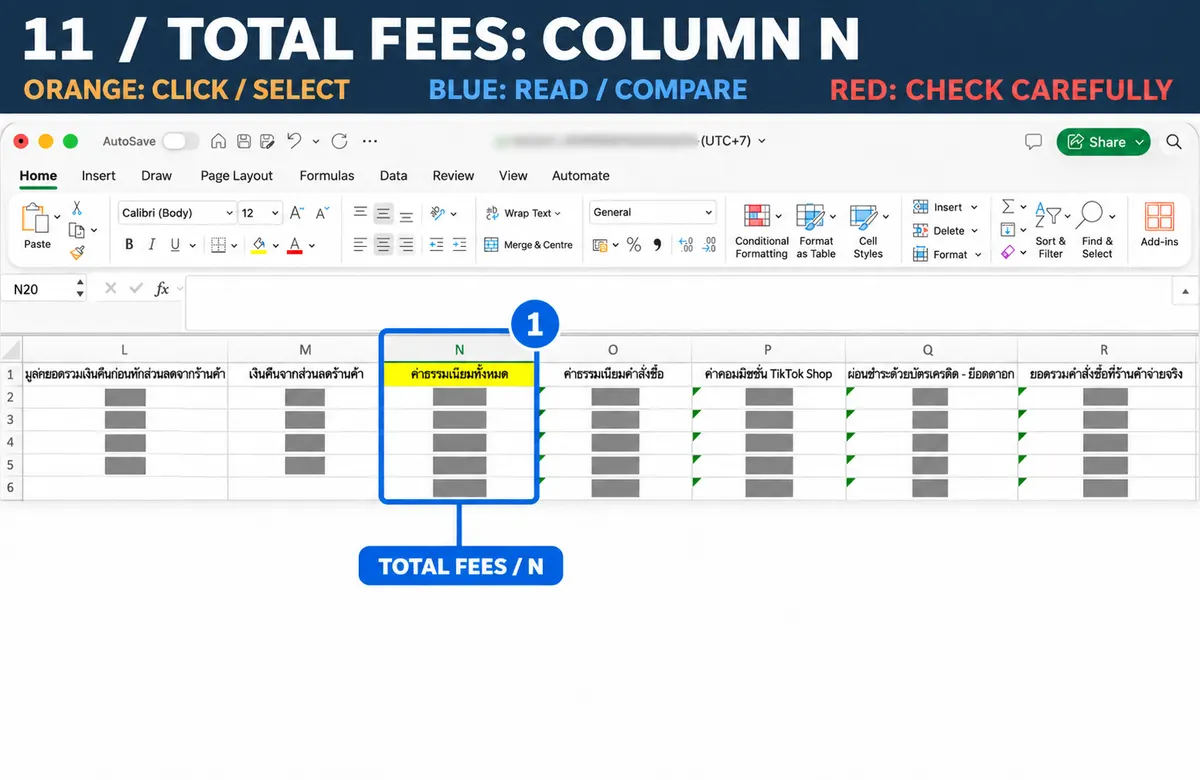
The blue box points to Total fees — N in the sample screenshot. Check the column header before totalling, because the position may change in other report versions.
- Column U: Customer Shipping fee
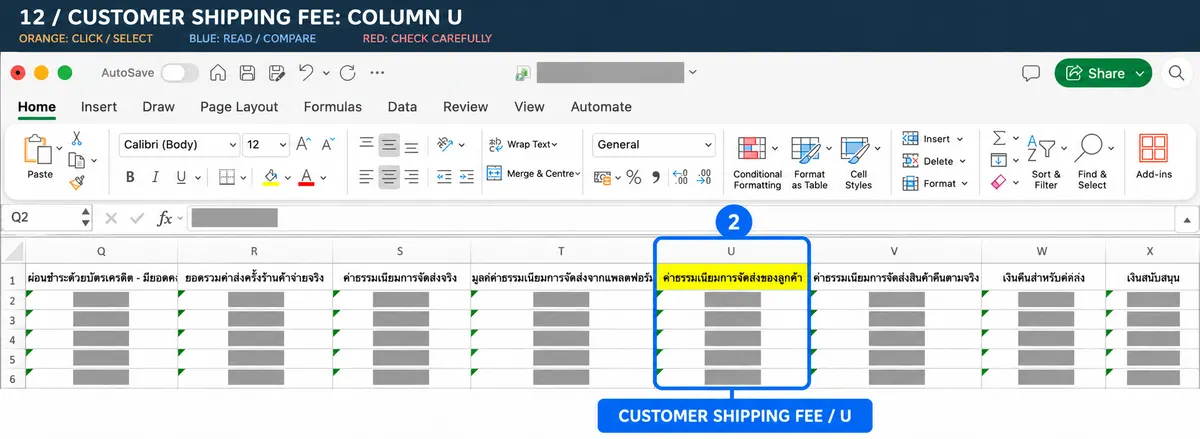
The blue box points to Customer shipping fee — U to show the buyer's shipping component. Check how it relates to Total fees before using it to summarise expenses.
Check the structure of the amounts before totalling expenses: do not add Customer shipping fee to Total fees automatically. Check whether it is already included in the fee or shipping components, and use the signs as in the actual report.
- Separate totals from sub-items; do not add the two levels twice.
- Use Total settlement amount, or a net-received column with the same meaning in the actual file, to check money received from orders, and compare it against the revenue details, fees, shipping and adjustments in full.
- G + U in the example is the figure for comparing revenue, not the net amount received after fees. Check the column definitions before using the formula.
6. การกระทบยอดเงินเข้า Wallet
Use the Withdrawal records section of the Income file:
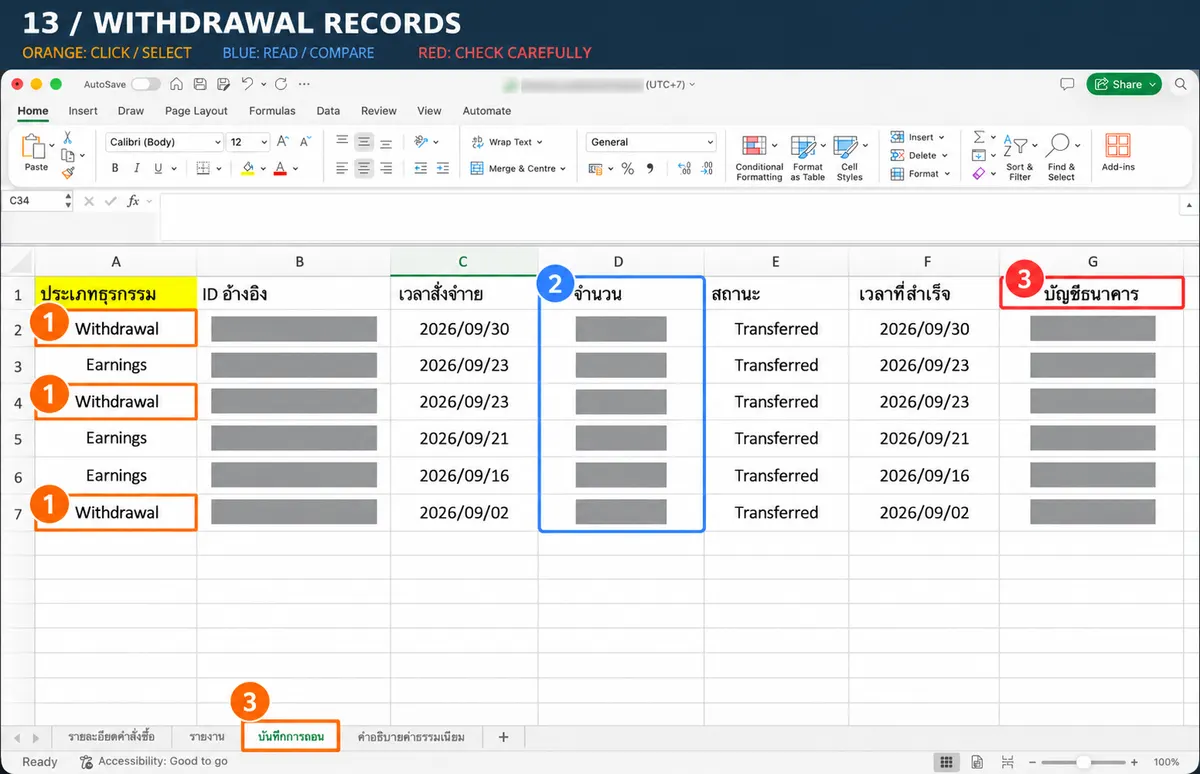
Orange box ① Withdrawal selects only withdrawal items. Blue box ② Amount (D) is used to total the selected items, and orange box ③ Withdrawal records is the active sheet. The reference ID (B) and bank account (G) data are hidden. Do not count Earnings rows as withdrawals.
- Filter
Type = Withdrawal - Total the Amount column to find the amount transferred to the bank
- Check the status and the date the withdrawal succeeded, then match the withdrawal amounts with the bank statement. Separate money in transit if it reaches the bank in a different period.
- Use the previous period's closing balance as the brought-forward balance, and check it against the platform's balance report.
- Calculate brought-forward balance + total money in − total money out = carried-forward balance, including adjustments in their actual direction.
- The Amount of the last transaction is not automatically the closing balance. If the withdrawal file does not cover every movement, use an additional report before concluding.
Summary: check revenue in both directions, separate the net amount received from revenue, then connect to the Wallet and the bank. For N/A, check the order number, date range, status and adjustments before classifying receivables or pending items; do not rely on N/A alone to decide.